

Mount Panorama Bathurst Track Map An Expert Explainer
Welcome to Mount Panorama. To Aussies, it's simply 'The Mountain', a hallowed piece of public road that, for a few glorious weekends a year, transforms into the country's most revered and feared motorsport battleground. It's more than just a ribbon of asphalt; it's a living, breathing challenge defined by its insane 174-metre climb and the ever-present, unforgiving concrete walls.
Getting your head around the mount panorama bathurst track map is the first real step to appreciating the white-knuckle skill and pure guts it takes to be fast here.
An Icon Carved from the Landscape
Mount Panorama isn't your typical, purpose-built racetrack. It's a national treasure carved directly into the hills of Bathurst, New South Wales. For most of the year, you can drive it yourself, but you'll be sticking to a strict speed limit. When the flags drop for monsters like the Bathurst 1000, though, it becomes a modern-day colosseum where legends are forged and hearts are shattered.
The track's split personality is what makes it so special. It kicks off with a relatively simple, flat-out blast down the pit straight before the road just rears up, launching cars into a tight, technical, and terrifying climb. This dramatic shift is why a good track map is so crucial for drivers and fans alike. It helps you visualise the sheer insanity of tackling blind crests and claustrophobic corners where a single centimetre of error means disaster.
This diagram breaks down the raw numbers that make The Mountain so formidable.
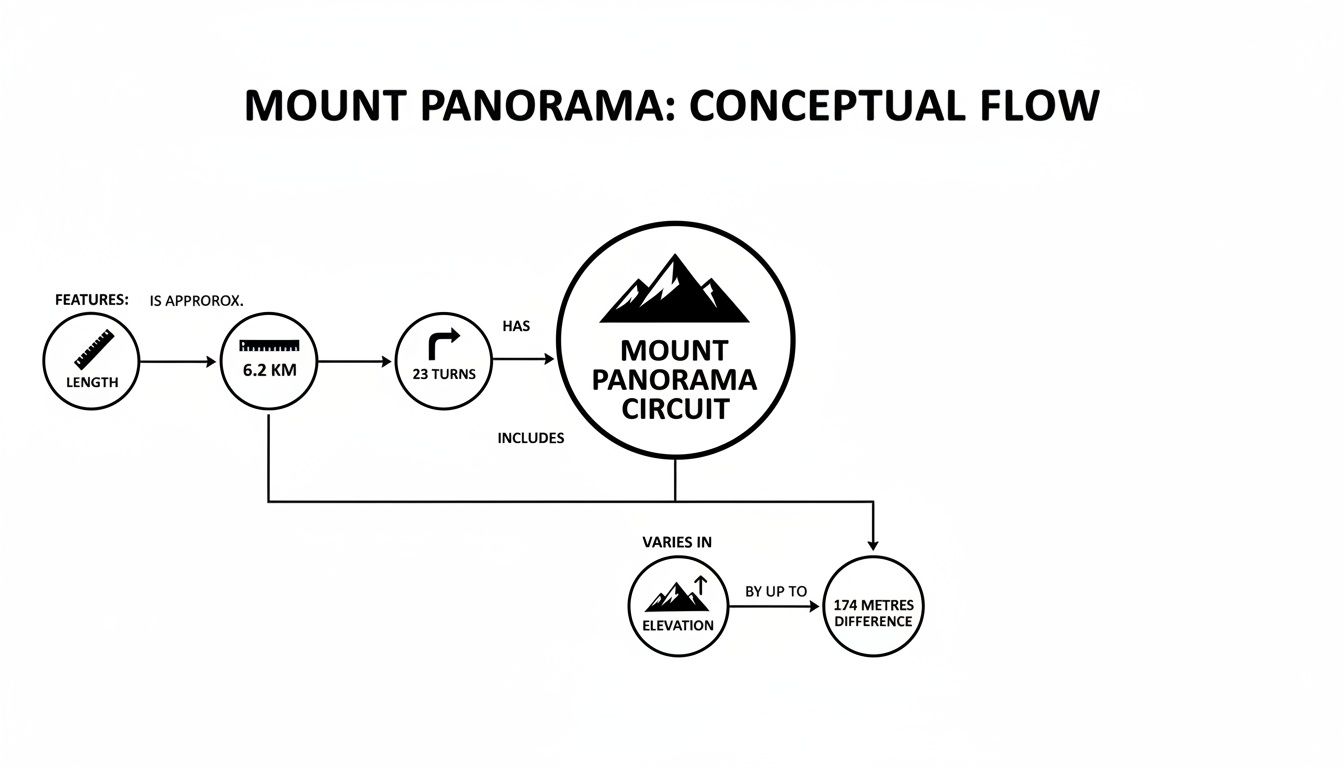
You can see it right there in the data—it's a circuit of two halves. Blistering high-speed straights bolted onto a mountain section so demanding it's unlike anything else in the world.
The Mountain's Vital Statistics
So, what are we dealing with? The Mount Panorama Circuit is a gruelling 6.213 km street circuit packed with 23 turns that will test every component of a race car and every nerve in a driver's body. The elevation change is the real killer, though—a staggering 174 metres from the lowest point at Conrod Straight to the highest at Skyline.
This combination makes it one of the toughest racetracks on the planet. To get a deeper appreciation for this iconic track, you can explore additional insights about Mount Panorama's layout.
To conquer Mount Panorama, you first have to respect it. The track map doesn't just show you corners; it tells a story of elevation, speed, and immense risk. Every single line and curve represents a split-second decision that separates glory from the concrete wall.
Ultimately, understanding the layout is where a true appreciation for Mount Panorama begins. The map is your key to unlocking the strategy, the bravery, and the raw pace needed to win on The Mountain.
Where Speed is King: Mastering The Straights
The straights at Mount Panorama are where legends are made and rivalries are settled. We're talking speeds nudging 300 km/h. But don't mistake them for simple stretches of asphalt; these are intense tests of engine power, aerodynamic grip, and pure, unadulterated driver bravery. A good Mount Panorama Bathurst track map will show you these are the places where a race can be won or lost.

It all kicks off with Mountain Straight, a punishing 1.111-kilometre climb that feels anything but straight. As cars rocket out of Hell Corner, the driver’s foot is flat to the floor, the engine screaming as it battles a brutal 1-in-6.13 gradient. This relentless incline puts enormous strain on the machinery. Any hesitation here costs valuable tenths of a second that you’ll never get back.
Think of it as the punishing warm-up act before the main event: the legendary Conrod Straight.
The Legendary Conrod Straight
After surviving the treacherous, gravity-fuelled plunge from Skyline, drivers fly out of Forrest’s Elbow and onto one of the most famous pieces of tarmac in motorsport. At a massive 1.916 kilometres, Conrod Straight is where modern Supercars truly unleash their fury. The feeling must be immense—the car hunkers down, the world outside blurring into a tunnel of green and grey.
For decades, this was just a flat-out blast from the Elbow to Murray's Corner, a raw test of horsepower. But as cars got faster, safety concerns led to a game-changing addition.
The Chase is arguably the fastest and bravest sequence of corners in Australian motorsport. It demands absolute commitment, with drivers arriving at nearly 300 km/h before flicking the car right, then left, then right again through a high-speed chicane that separates the legends from the pack.
Taming The Chase
This right-left chicane, known simply as 'The Chase', was put in to scrub off speed before the final corner. It’s an incredibly fast and daunting section where drivers have to brake from top speed while turning into the first right-hander. Getting it right is everything.
- Entry Speed: You have to wash off just enough speed without killing your momentum for the exit. It's a delicate, high-stakes balancing act.
- Kerb Usage: Hitting the kerbs hard can shave off time, but get it slightly wrong, and the car will be catastrophically unsettled.
- Overtaking Zone: This is a prime spot for a late-braking dive, but it demands perfect timing and a massive dose of confidence.
Mastering high-speed sections is a common theme at the world’s greatest circuits, a challenge you can see reflected in other iconic layouts, as our guide to the Melbourne GP Circuit map explains. From the exit of The Chase, it’s one last blast down to Murray’s Corner, completing a lap defined by its incredible contrasts of slow, technical corners and blindingly fast straights.
Conquering The Legendary Climb To Skyline
After the flat-out blast up Mountain Straight, the Mount Panorama circuit map shows you where the track really starts to bite back. This is the legendary climb to the summit, a tight, concrete-lined ascent that doesn't just challenge drivers—it breaks them. Get it wrong here, and your race is over.
This part of the mountain is a brutal sequence of corners that asks for total commitment, a bit of bravery, and an intimate feel for what the car is doing when gravity is actively working against you.
The journey skyward starts at Hell Corner, a 90-degree right-hander that looks simple enough on paper. But looks can be deceiving. A perfect exit here is absolutely everything, as it slingshots you onto the long, steep drag up Mountain Straight. Any hesitation, any loss of momentum, is a penalty you pay all the way to the top. It's the foundation of a fast lap.
The Climb Through The Cutting
At the crest of Mountain Straight, drivers are greeted by The Cutting. This is an insanely tight, blind, left-hand corner that's literally carved out of the rock face. The gradient here is a staggering 1 in 6.13, a slope that completely throws the car's balance off under heavy braking. It’s infamous for creating chaos, simply because there is zero room for error.
To get through The Cutting in one piece, a driver has to:
- Brake way earlier than their instincts are screaming, all thanks to that steep incline.
- Turn in completely blind, putting total faith in their track markers and memory.
- Wrestle with understeer as the front of the car goes light over the crest.
From there, the track continues its climb through a series of flowing bends that feel more like a tarmac rally stage. The claustrophobic walls and need for rhythm are a bit like another famous street circuit, which you can read about in our guide to the legendary Monaco Grand Prix circuit.
Reid Park to Sulman Park
Out of The Cutting, the track flows into Reid Park, a much faster left-hander where cars get scarily close to the outside wall on exit. This is all about setting up for the next right-hand kink at Sulman Park—the highest point on the circuit. Through here, the car feels nervous and light, constantly dancing on the very edge of grip.
"Over the top of the Mountain is where you find out who's really committed. The car is dancing on the very edge of grip, and you're threading a needle between concrete walls with no margin for error. Skyline is the ultimate test of faith."
The entire Mount Panorama Circuit map lays out a massive 6.213 km test of skill, with its 23 turns and a huge 174 m of elevation change. But this climb is its heart and soul. One mistake through this section can ruin a whole day's work, which is exactly why drivers respect it so much.
This whole relentless climb finally leads to Skyline, a terrifying, blind right-hand crest. As the car reaches the peak, it goes incredibly light—almost weightless—before plunging into the dizzying, gut-wrenching descent of The Esses. It’s a moment of pure, blind commitment, where you turn the wheel without seeing the exit, just trusting the road will be there to catch you on the other side.
Navigating The Treacherous Downhill Plunge
Once you crest the blind peak at Skyline, you’re not just heading downhill—you’re being thrown into one of the most intense and claustrophobic sections in all of motorsport. This is the plunge, a gravity-fuelled rollercoaster where the concrete walls feel like they’re closing in on you. Down here, pinpoint precision is the only thing standing between a blistering lap time and a wrecked race car.
What goes up must come down, right? Well, at Bathurst, the descent is a whole lot more terrifying than the climb. This entire sequence is a high-stakes test of nerve and raw talent, kicking off with the legendary Esses.
This isn't just one corner; it's a rapid-fire, left-right-left combo that sends the car hurtling down the mountain. The pros use the kerbs aggressively, practically turning the sequence into a straight line. But get it wrong by a whisker, and you’ll be intimately acquainted with the concrete. A quick glance at a mount panorama bathurst track map shows the turns, but it can never capture the visceral feeling of speed and compression that truly defines this section.
The Dipper And Forrest's Elbow
As soon as you exit the last of the Esses, you drop straight into The Dipper. It's an incredibly sharp and steep left-hander that violently compresses the car's suspension. It’s so severe that it’s common to see cars lift an inside wheel clean off the ground. The sensation is like being dropped off a small building while trying to thread a needle.
The downhill run from Skyline is pure instinct. You're dancing the car between two concrete walls, and the track is falling away from you. The Dipper compresses everything so hard you feel it in your bones, and a perfect exit from Forrest's Elbow is your only ticket to a fast time down Conrod.
After that jarring compression, the track quickly kinks right before funnelling you into the final challenge of the mountain: Forrest's Elbow. This is a notoriously difficult, tight, downhill, off-camber left-hander. Its importance cannot be overstated, because it’s the gateway to the legendary Conrod Straight.
Botch the exit here and your lap time is toast. You’ll be bleeding speed all the way down the nearly two-kilometre straight. Drivers have to brake late, rotate the car on a dime, and get on the power as early as humanly possible—all while fighting the tricky camber that’s trying to spit the car out into the wall. It’s the final, critical piece of the mountain puzzle before the flat-out blast to finish the lap.
Bringing The Bathurst Legend Into Your Home
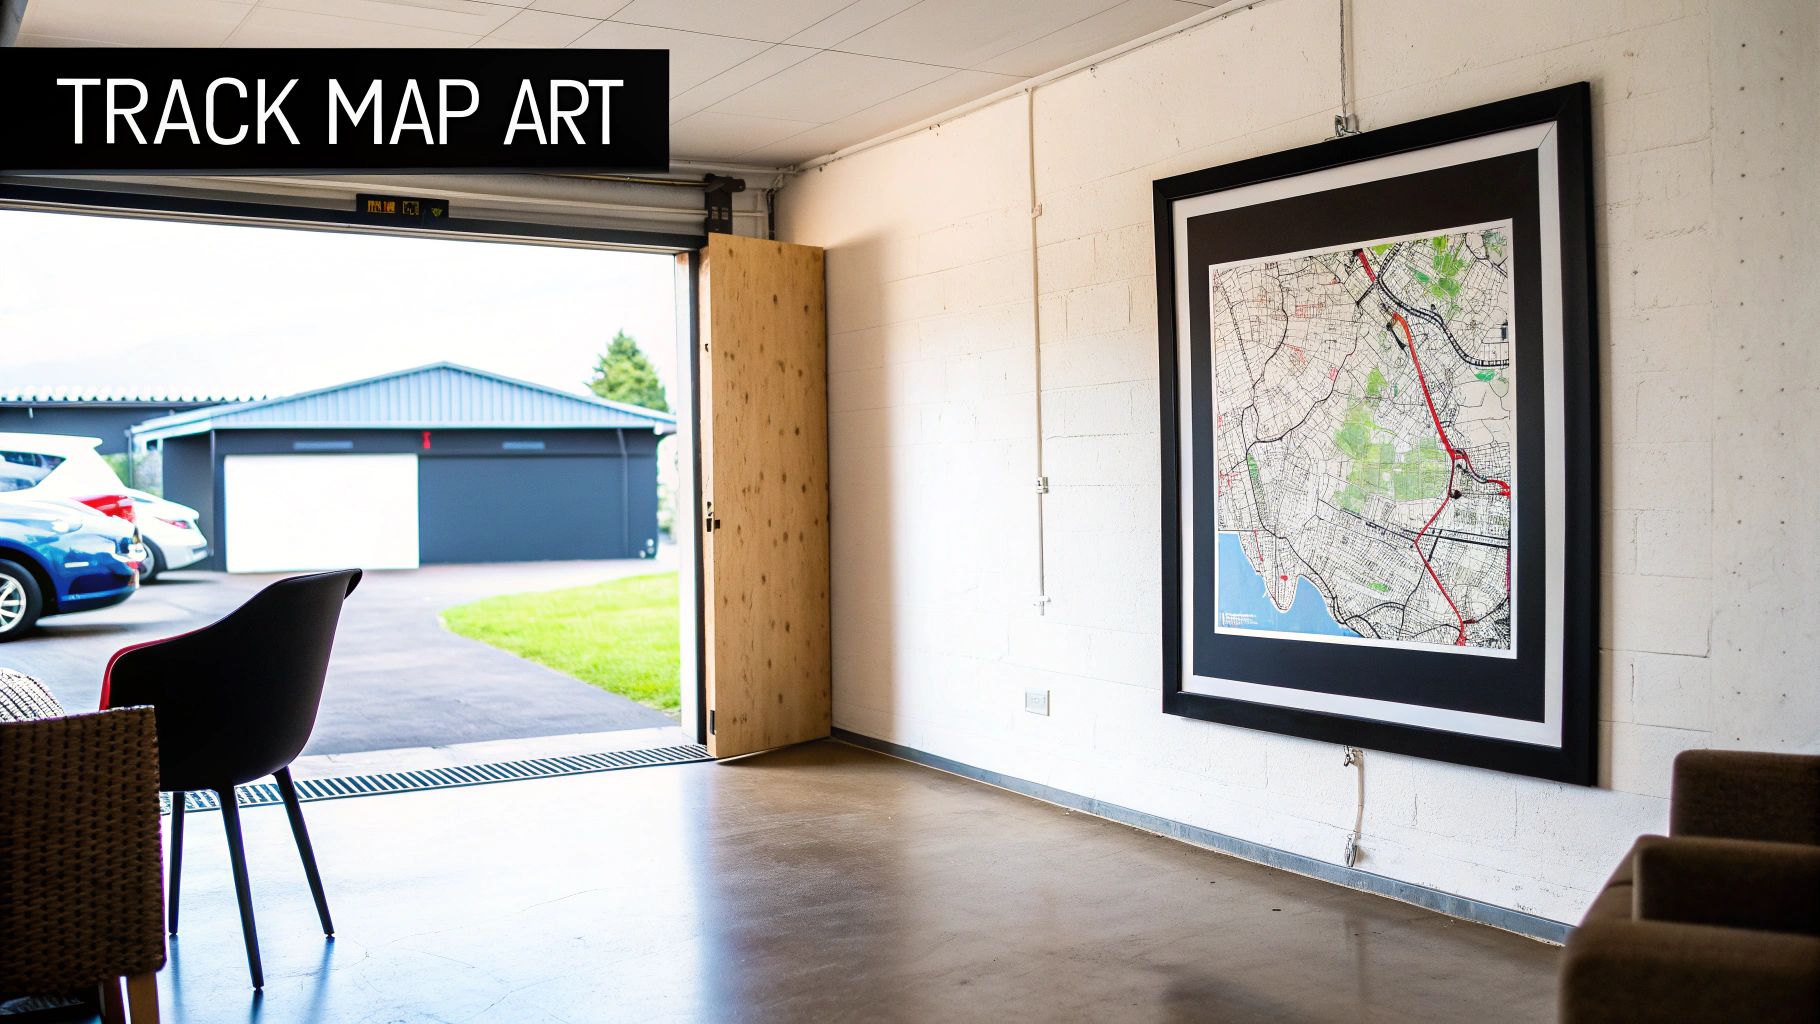
A map of Mount Panorama is so much more than lines on paper. It's a piece of pure Australian motorsport history, and honestly, a genuine work of art. It takes all the technical bits—the insane gradients, the sharp corner angles, the sheer length of those straights—and weaves them into a visual story that just screams Bathurst.
When you see the entire layout in one go, you get a whole new appreciation for the place. You can finally connect the dots between that terrifying climb up the Mountain, the heart-in-your-throat plunge back down, and the flat-out blasts along the straights. It really drives home the skill it takes to string a perfect lap together. Suddenly, names like The Dipper and Skyline aren't just points on a circuit; they're real, tangible challenges in a grand tale of speed and guts.
More Than A Map, It's A Piece of Art
A high-quality Mount Panorama Bathurst track map is the perfect centrepiece for any office, garage, or living space. It’s a way to put your passion for motorsport on display that feels both personal and seriously stylish. It turns your love for The Great Race into a fantastic conversation starter.
Forget just another poster; a well-designed print is a statement. It shows you get the sport on a deeper level than just what’s on the TV, appreciating the strategy and engineering that truly define a race at Bathurst.
A circuit map tells a story that words alone can't. It captures the flow, the danger, and the raw speed of a track like Mount Panorama, letting you trace the lines of legends from the comfort of your own home.
Choosing The Perfect Track Print
When you’re picking out circuit art, detail and quality are everything. The best pieces nail that sweet spot between looking incredible and being factually accurate, creating something that’s both beautiful and informative.
- Clarity and Detail: Look for prints that clearly label every iconic corner and section. It adds that extra layer of context to the layout.
- Quality Materials: A print on premium canvas or framed with high-quality materials instantly elevates it from a simple map to display-worthy art.
- Design Style: Pick a style that fits your space, whether that’s a clean, minimalist outline or a more detailed, data-rich design.
Our detailed map prints, for example, capture every legendary corner like Forrest’s Elbow and Hell Corner, and pair them with key stats, making them a must-have for any true motorsport fan. These pieces blend precision art with genuine Aussie motorsport data, perfectly celebrating The Mountain's rich history.
Ultimately, bringing a piece of The Mountain into your home is about celebrating a legacy. You can explore a curated selection of high-quality racetrack framed prints that capture the untamed spirit of Bathurst and other iconic circuits from around the globe.
Celebrating The Great Race And Its Lap Records
The lines on a **Mount Panorama Bathurst track map** are so much more than just a guide to the circuit. They represent decades of motorsport history, charged with raw emotion, drama, and sheer Aussie grit. At the very heart of this legacy is the Bathurst 1000, known to all as ‘The Great Race’.Every October, this brutal 6.213 km layout becomes a modern-day colosseum for Australia's most important touring car endurance race. The event is a national institution, a pilgrimage for die-hard fans who flock to The Mountain to see heroes made and hearts broken. Its unforgiving nature has cooked up some of the most iconic moments in motorsport history.
The Pursuit Of The Perfect Lap
Endurance might be the goal, but it's raw, unadulterated speed that truly captures the imagination. Lap records at Bathurst are the stuff of legend, a perfect storm where driver, machine, and track align in sublime harmony. These records are a pure testament to bravery and razor-sharp precision.
"A lap record at Bathurst isn't just a number; it's a statement. It's a driver pushing beyond the perceived limits on a track that offers no second chances, cementing their place in the history of The Mountain."
The outright lap record belongs to Christopher Mies, who threw down an unbelievable 1:59.2910 during the 2018 Challenge Bathurst. But when it comes to The Great Race itself, James Golding set the current race lap record with a scorching 1:59.8375 on December 2, 2021. You can dive deeper into the circuit's iconic stats and history on Wikipedia.
A Stage For Motorsport Legends
The Great Race has seen countless legends etch their names into the history books, from Peter Brock’s untouchable nine victories to the fierce modern-day rivalries that set the track alight each year. The event's rich heritage is right up there with other globally famous motorsport categories. If you're keen on the origins of open-wheel racing, our article exploring F1 history provides fascinating insights.
At the end of the day, every single corner and straight at Mount Panorama tells a story, forging an unbreakable link between today's heroes and the legends of the past.
Got Questions About Mount Panorama? We've Got Answers
Even for die-hard motorsport fans, Mount Panorama can be a bit of a head-scratcher. It’s got this unique double life as both a public road and a world-class racing circuit, which naturally leads to a few questions. Let's clear up some of the common ones about this legendary track.
Probably the biggest surprise for first-timers is learning that, yes, Mount Panorama is a public road most of the year. When it isn’t echoing with the sound of V8s, it’s a two-way tourist drive called Panorama Avenue. There's a strictly enforced 60 km/h speed limit, meaning anyone can drive the iconic climb and descent, just at a slightly more relaxed pace.
The Numbers Behind the Mountain
So, what are the hard stats that make this circuit such a monster? A good Mount Panorama Bathurst track map tells the story in numbers.
- Total Length: One lap is a punishing 6.213 kilometres.
- Race Distance: The legendary Bathurst 1000 runs for a total of 161 laps.
- Elevation Change: There's a wild 174-metre difference between its lowest point and the summit.
- Top Speed: Modern Supercars nudge 300 km/h down Conrod Straight.
These figures really drive home the sheer scale and brutality of the place. It's a circuit that demands everything from both car and driver—raw power on the straights and absolute precision through the twisty bits.
Mount Panorama is a track of two halves. The data shows a high-speed lower section and a tight, technical mountain climb. Mastering both is the only way to win The Great Race.
Knowing these details gives you a much deeper appreciation for what the drivers pull off here. If you've got any more questions or want to chat about custom artwork, just get in touch with our team through our contact page.